Halloween effects,
straight from a sketch.
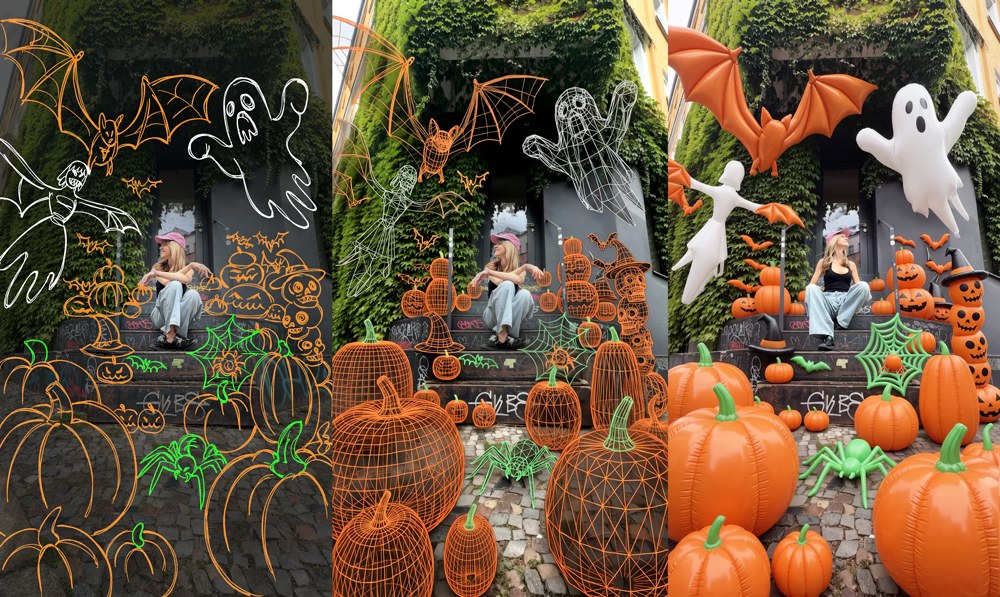
Draw your own decorations over your real footage, let Nano Banana 2 turn the sketch into 3D wireframe renders, and make them pop with Google Omni Flash. Your hand, your style, your shot.
How it works
Step by step.
01Sketch over your footage
ProcreateExport one frame from your footage and bring it into Procreate. On a layer above, sketch your Halloween decorations exactly where you want them: huge pumpkins on the steps, ghosts and bats in the air. Loose, flat outlines are perfect, the sketch only tells the AI where things go and how big they are.
Export two versions: the clean frame and the frame with your sketch on top.
02Turn the sketch into 3D wireframes
Nano Banana 2Give Nano Banana 2 both images: the clean frame as Image 1, the sketch version as Image 2. It keeps your shot untouched and builds the decorations exactly where you sketched them:
Keep @Image 1 exactly as it is. Add Halloween decorations in the positions of the sketched elements in @Image 2. Render all decorations as 3D wireframe objects: thin, crisp contour lines wrapping around the full volume of each shape like a 3D mesh render, hollow with no solid surfaces, so the real scene stays visible through them. Match the perspective, scale and lighting of the photo.03Make a second still in a balloon look
Nano Banana 2Generate the second still the exact same way, from the same two images: the clean frame as Image 1, the sketch version as Image 2. Only the look changes, this time the decorations come out as inflated, glossy balloon objects. This image is what the wireframes will inflate into in the animation:
Keep @Image 1 exactly as it is. Add Halloween decorations in the positions of the sketched elements in @Image 2. Render all decorations as inflated 3D balloon objects: chunky, glossy and rounded, like air-filled balloons with soft specular highlights and smooth seams. Match the perspective, scale and lighting of the photo.You can push this as far as you like: any look works as long as the camera and the scene stay exactly the same between the two stills.
04Animate between your stills
Google Omni FlashGoogle Omni Flash animates from a start frame to an end frame. Upload your stills with the add button (+) in the prompt bar, then simply name them in the prompt as start and end frame. First the big reveal, from the dimmed sketch look to the full 3D wireframe scene:
The first image is the start frame, the second image is the end frame. All elements transform in single pops: every flat sketch inflates into its 3D wireframe version, puffing up with volume as if pumped full of air, slightly overshooting in size and jiggling like jelly while it inflates. The existing sketch lines stay exactly in place and stay crisp, new wireframe lines unfold out of them into depth. During this pop the photo brightens from the dimmed sketch look to normal daylight. Locked static camera, no camera movement at all.Then a perfect loop: wireframes inflate into the balloon objects and back. The trick is using the same image as start and end frame:
The first image is the start frame and also the end frame, so the clip loops seamlessly. The 3D wireframe elements jiggle and inflate into the glossy 3D balloon objects shown in the second image, then deflate back into their wireframe state. Locked static camera, no camera movement at all.If a generation drifts, name the frames more explicitly in the prompt (for example "the sketch still" and "the wireframe still"), the model matches them to your uploads.
Pro TipAlways end your prompt with "Locked static camera, no camera movement at all." That one line keeps the generated clips glued to your real footage. And since Omni generates short clips, build your edit from several of these pops instead of one long generation.
Join the
Newsletter.
Get new AI tutorials, workflows and tool tips first, plus the free Image to Prompt Analyzer and the Top Creative AI Tools list.